
Tip: It is a good idea to have the "Source Code" palette (Window > Source Code) or split the window (command/ctrl-Y) open, so you can follow the process there.
Step 1.
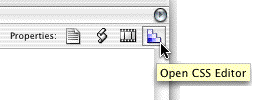 Click on the "Open CSS Editor" in the upper right corner, this will bring up the "CSS Editor".
Step 2.
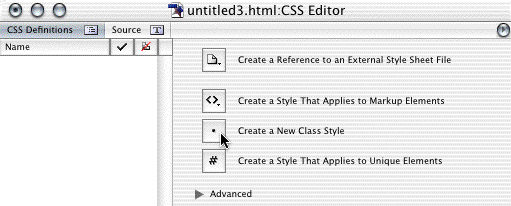
Click on the "Create a New Class Style".
 Accordingly the CSS palette will change.
Step 3.
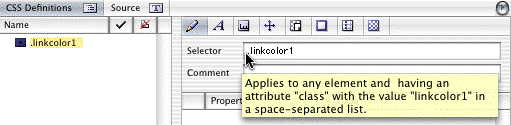
Replace the selector .class with the selector .linkcolor1 - don't forget the dot before .linkcolor1 .
Hit return.
Now click on the "Font Properties" tab (The A).
Step 4.
Here you set your font definitions for the selector .linkcolor1.
Choose the Font family and font Size (not the color), and if you like the link to always show with or without underline - check or leave "Underline" unchecked.
If you select any color here, it will not work properly.
Of course you can set other attributes; these are simply the attributes that are necessary, to make this work.
My definitions for .linkcolor1:
.linkcolor1 { font-size: 12px; font-family: Arial, Geneva, sans-serif; background-color: transparent }
You have set the declaration for the selector .linkcolor1 . This is the "parent" declaration for .linkcolor1 ... .
Now you need four more selectors, that will inherit most of their declarations from the "parent" selector .linkcolor1 .
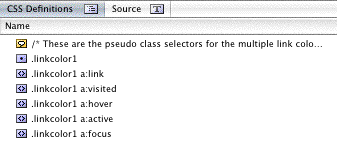 Now you need to set the definitions for .linkcolor1 in this order and written like this.
.linkcolor1 a:link
.linkcolor1 a:visited
.linkcolor1 a:hover
.linkcolor1 a:active
.linkcolor1 a:focus
Remember the dot before .linkcolor1 and the space between
linkcolor1 <-and-> a:link.
"Note that the a:hover must be placed after the a:link and a:visited rules, since otherwise the cascading rules will hide the 'color' property of the a:hover rule.
Similarly, because a:active is placed after a:hover, the active color will apply when the user both activates and hovers over the A element". (W3C CSS2 5.11.3) (World Wide Web Consortium)
Repeat the above steps for elements .linkcolor1 a:link, .linkcolor1 a:visited, .linkcolor1 a:hover, .linkcolor1 a:active (In this order) defining the color, underline/none and the background color (if you like). something like below.
.linkcolor1 a:link { color: lime; text-decoration: underline; background-color: transparent }
.linkcolor1 a:visited { color: silver; text-decoration: none; background-color: transparent }
.linkcolor1 a:hover { color: lime; text-decoration: none; background-color: transparent }
.linkcolor1 a:active { color: yellow; text-decoration: underline; background-color: transparent }
.linkcolor1 a:focus { color: navy; text-decoration: none; background-color: transparent; cursor: pointer }
When you have done this, you repeat all the steps for the rest of your link colors.
Two or three or ten link colors, all depending on how many you need.
Tip: When you have made the first link declaration, open the "Source" tab and select .linkcolor1 copy/paste and rename .linkcolor1 to .linkcolor2 etc. - go back to "CSS Definitionns" tab and do your editing there.
Or:
and then rename .linkcolor1 to .linkcolor2 etc. in the CSS Editor.
Saves you a lot of writing.